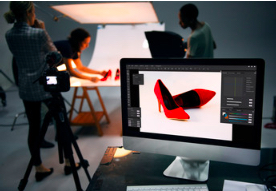
 Product photography cultivates a positive relationship between brands and consumers. It draws customers in with appealing styling while portraying products accurately and realistically.
While it is crucial to maintain consistency in your brand’s visuals, you can vary the types of product photos you take. These include individual shots, group shots, lifestyle shots, and close-ups.
Product photography is an essential part of e-commerce. It allows users to showcase their products and help them stand out from the competition. However, there are many factors to consider when shooting product photos, including lighting conditions. Using the right light can help you create high-quality product images that are crisp and vibrant.
The first thing to consider when taking product photos is the location of the light source. This will determine whether you want to use natural or artificial light. Natural light is ideal for most product shots, but it can be challenging to control the direction of the light and reduce shadows. Alternatively, you can use artificial light that mimics natural light. This is typically more difficult to control, but it can help you achieve a more balanced image.
You should also consider the color temperature of the light. This is important because it affects the color of your products. If the color temperature is too low, it can make the products look yellow or orange. If it’s too high, it can wash out the colors and make them look dull. Using different color filters to change the temperature of the light is one way to fix this problem.
Another factor to consider is the number of lights you need. A two-light setup is the most popular, but you can also use three or more lights to achieve various effects. For example, using a ring light can create bright front lighting and highlight the product’s details. Adding a diffuser can prevent glare and soften the light. You can also use a backlight to add contrast and highlight specific parts of the product.
Lastly, you should always pay attention to reflections. They can ruin an otherwise beautiful shot. You don’t want your gorgeous emerald ring to have a reflection of the camera lens in it!
To avoid this, you can try using a reflector to bounce light back onto the product and minimize shadows. You can also experiment with varying the position of the light sources to find the perfect configuration.
Camera Settings
A high-quality product photo can grab attention, share a message, and even convey emotion. But to make a great product photo, it’s important to know how to use the camera settings to get the best results. Here are some of the most important camera settings to keep in mind for product photography:
ISO: This setting controls the camera’s sensitivity to light. Ideally, you should choose a low ISO to reduce the chances of digital noise. However, if you’re shooting in low-light conditions, it may be necessary to increase your ISO to avoid blurry images.
Shutter speed: This setting controls how long the shutter stays open to capture a photograph. In product photography, you want to ensure that all the details of your product are sharp and clear. Typically, you will want to use a slow shutter speed to minimize motion blur. For example, if you are using a tripod for your product photography, you can set the shutter speed to 1/60th of a second or lower.
Aperture: Aperture is a camera setting that determines the depth of field and how much of your product will be in focus. For example, if you are shooting on a white or plain background, it’s often best to use a wide aperture (f/2.8 or lower) to help your subject stand out from the background. Conversely, if you are shooting in an environment with lots of distractions, you may want to use a narrower aperture (f/5.6 or higher) to blur out the background and focus on your product.
In general, it’s a good idea to start with the manual mode of your camera and then learn how to use other settings as you grow more comfortable. This way, you can take full control of the exposure triangle and achieve professional-looking results. However, if you’re new to photography, it can be helpful to find a video tutorial on how to take quality photos. For example, one tutorial provides detailed instructions on how to shoot a professional-looking product photo. The video covers everything from the camera setup to lighting and prop styling.
Editing
Product photography is the backbone of e-commerce websites. It’s used on e-commerce product pages, social media, digital marketing, and ad campaigns, and even for the packaging and labeling of products. That’s why it’s important to have consistency across all of these different applications and channels. Professional product photographers will have a checklist and a style guide that they follow to ensure that each of their shots is up to par. If someone sees that one of your products has a well-lit and clear image while another looks dark and blurry, they won’t be likely to come back.
For example, you want to make sure that your product photos are consistently shot on a white backdrop, that the backgrounds are clean and free of debris, that there’s clarity in the highlights and shadows, and that the size and dimensions are correct. You also want to consider whether or not you’ll be using these images in other contexts, such as for labels and packaging or in other marketing materials, so you’ll need to ensure that they are optimized for those formats.
Lastly, you should always be editing your images after they’re taken. This is especially true for product photography, as you want to remove any imperfections that could distract your shoppers and deter them from buying. Using various selection tools is a great way to achieve this. For example, you can use the marquee tool to select an area of a photo and then apply a gradient fill.
When you’re working with smaller products, you may need to use a comb tool or the brush tool to select just the part of your product that you want to highlight. Using these tools is a good way to add more definition and create a more textured image.
You can also use a variety of filters and adjustment layers to enhance the colors in your product photos, add textures, and change the tone or contrast. If you’re struggling to get a crisp focus in your product photographs, try using manual focusing and a lens with focus peaking, which highlights the area of the image that is in focus.
Post-Production
Post-production is an industry term used to describe all the work that takes place after a project has been shot. In product photography, this includes things like removing a background, sharpening, retouching, color correction, and creating gradients.
When it comes to e-commerce, product photography is an important part of building brand trust and showcasing the quality of your products. The key to successful product photos is ensuring that your shots are crisp, clean, and consistent. This requires meticulous attention to detail, and professional photographers will have a process in place that ensures consistency across all images.
For example, they might take a close-up shot to showcase the details and material of the product, a lifestyle photo showing how the product would look in context (like in a room or on a model), and a scaled image to give customers an idea of the size of the product. In addition, they might use a variety of colors to highlight different aspects of the product or include a transparent layer to show internal components.
Creating a quality product photo is not an easy task. It takes time to learn how to style the product, set up lighting, and composite multiple exposures. Once you have mastered the basics, you can start to experiment with more creative techniques. However, it is crucial to keep in mind that the quality of your final product will depend on the preparation and planning you put into the shoot.
A good product photographer will plan their shots ahead of time and write a shot list to ensure they capture all the necessary angles, views, and details. They will also have a backup plan in case something goes wrong during the shoot. This will save them time and money in the long run, while ensuring they have a high-quality product to sell.
Lastly, it is important to have the right equipment to create a quality product photograph. A basic product photography kit should contain a tripod, a white or black backdrop, a few reflectors, and a can of compressed air to blow away dust. It is also a good idea to invest in a lens with a wide aperture, as this will make it easier to capture detailed product shots.


 A piano is a heavy, delicate item that requires specialized equipment and careful handling. It also carries sentimental value for many homeowners. This makes it an expensive item to move, especially if you’re moving long distances. It’s best to leave this task to professional piano movers NYC, who can handle it quickly and safely. Their experience will help you avoid a costly mistake, such as damaging the instrument or your home.